This is a beginner-friendly walkthrough of building a tiny python-based MCP server built from scratch that lets an AI tool run one safe Cisco CLI command over SSH.
I use a local qwen3:4b model on Apple Mac.
The goal is not to build a full network automation platform. The goal is to understand each moving part.
What We Are Building
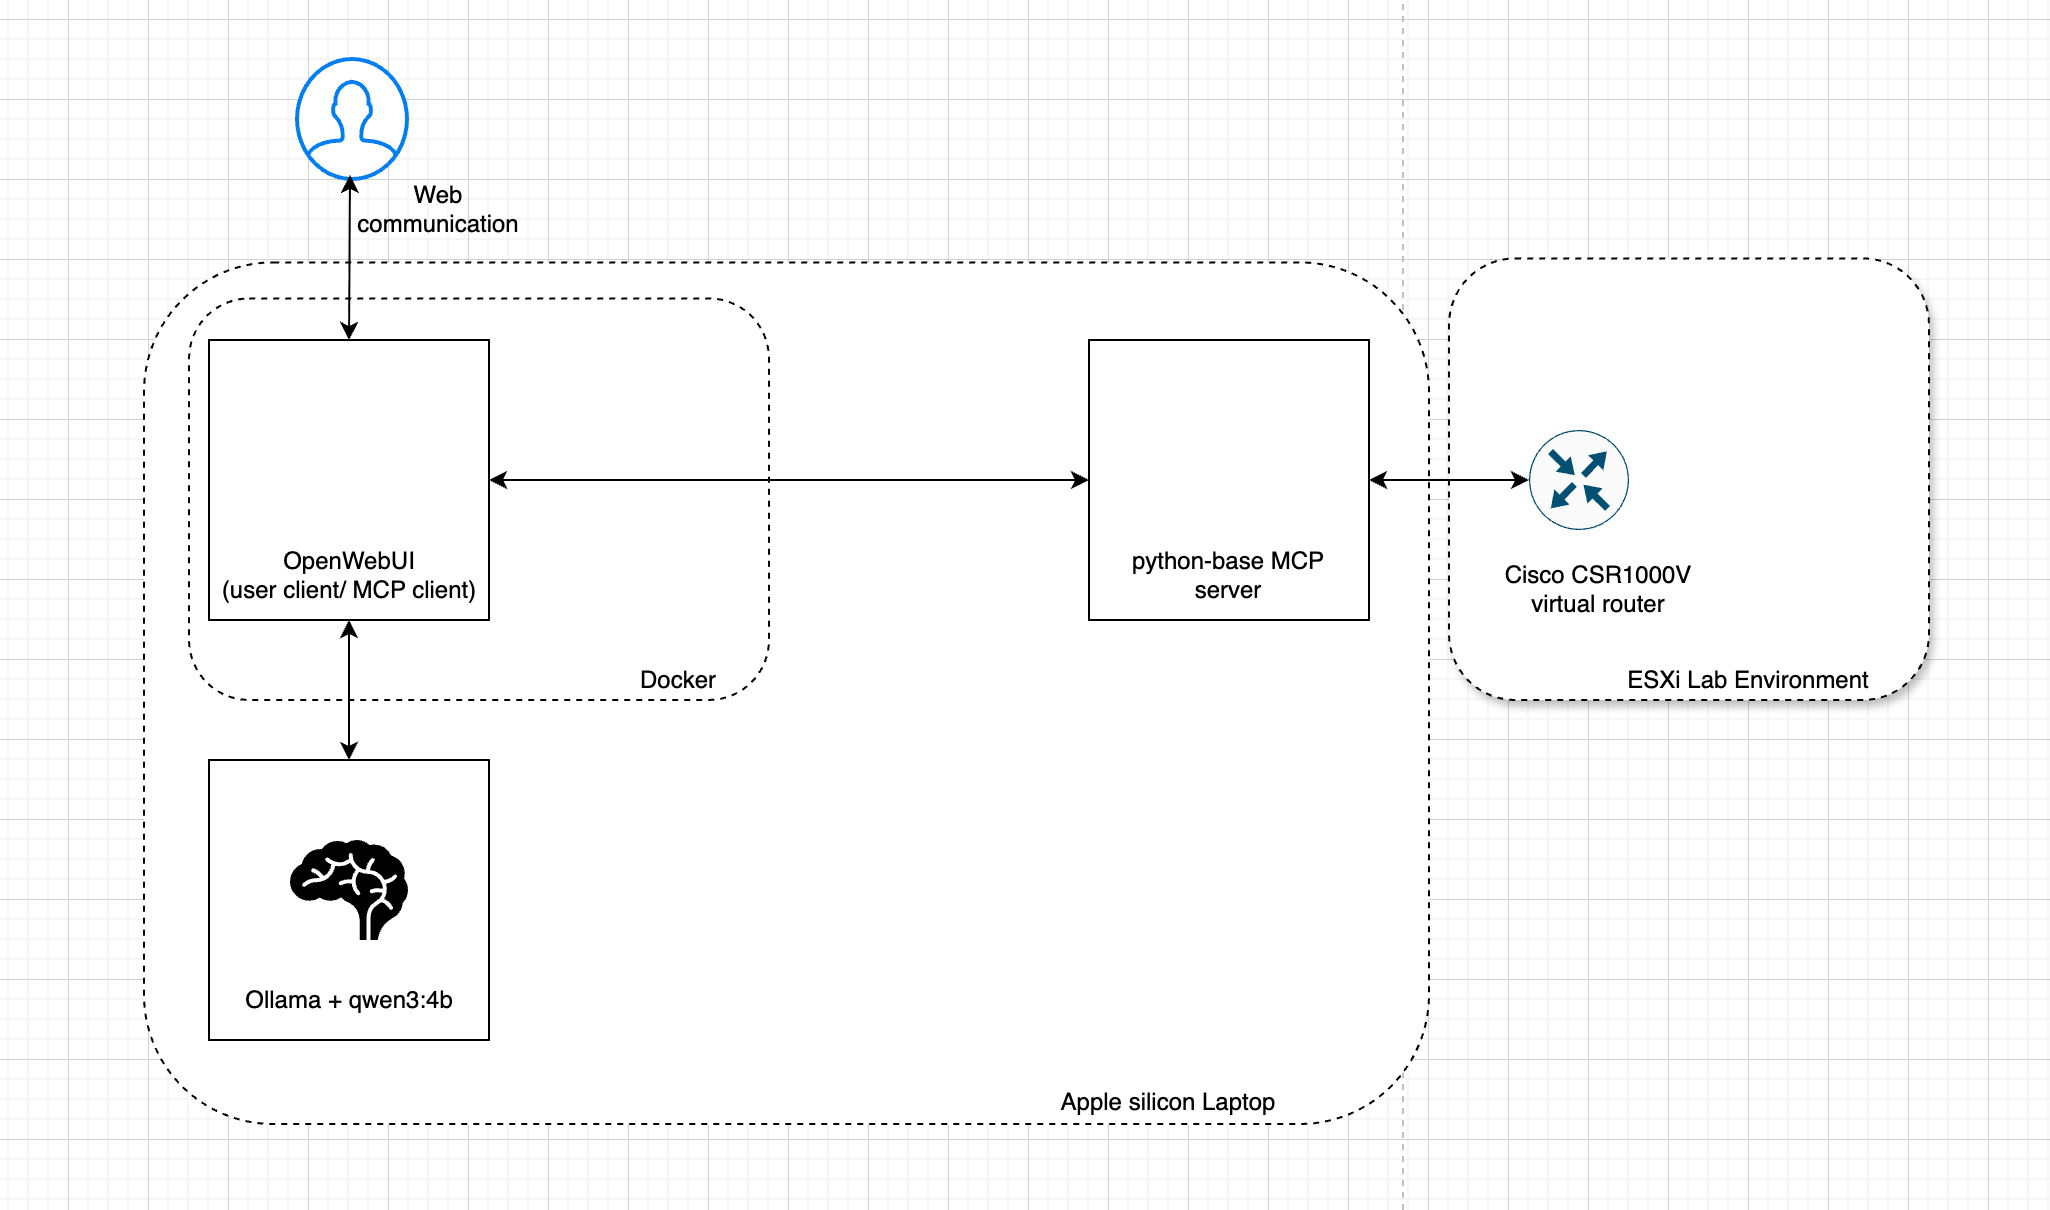
OpenWebUI does not SSH into the router directly. Instead, it connects to our MCP server. The MCP server exposes tools. One of those tools runs the Cisco command.
Prerequisites
- running cisco lab device (CSR1000V in my case)
- LLM model (I use local qwen3:4b - for concept it is enough)
- docker (I use docker host on Apple silicon)
First, a little theory…
What Is MCP?
MCP means Model Context Protocol.
For this project, the simple explanation is:
MCP lets an AI application discover and call external tools.
An MCP server is just a program that says:
- Here are the tools I provide.
- Here is how to call them.
- Here is the result.
In our case, the MCP server provides only one tool:
cisco_show_version
Project Files
The small project uses these 3 files to keep it simple:
├── 📄 .env
├── 📄 docker-compose.yml
└── 📄 server.py
.env
The .env file contains secrets for connecting to the lab router and minimum information for the OpenWebUI client to run from Docker.
Here is an example with placeholder values. If you follow along, create the .env file in your repository and enter the correct values.
CISCO_HOST=10.20.16.111
CISCO_PORT=22
CISCO_USERNAME=admin
CISCO_PASSWORD=jAYPs3eaGubaPtsChRPV
CISCO_ENABLE=udbf9tJh7xs898eaWMVw

WEBUI_SECRET_KEY=1032edc6c329a93e08b3e97fb8cc39a61e316d78f1ac1dcf9c6c7a0d6e560cc4
OLLAMA_BASE_URL=http://host.docker.internal:11434
docker-compose.yml
This is for running OpenWebUI which will connect to LLM on the one side and to the MCP server on the other side. My exact file looks like this:
---
networks:
  pa_mcp_network:
    driver: bridge

volumes:
  open-webui:
    driver: local

services:
  openwebui:
    image: ghcr.io/open-webui/open-webui:main
    container_name: openwebui
    restart: unless-stopped
    ports:
      - "8080:8080"
    networks:
      - pa_mcp_network
    environment:
      - WEBUI_SECRET_KEY=${WEBUI_SECRET_KEY}
      - OLLAMA_BASE_URL=${OLLAMA_BASE_URL}
    volumes:
      - open-webui:/app/backend/data
This is not main topic here. I’m just reusing working client from my another project to make life easier. [pa_mcp_2026]
server.py
This is the core file that contains the MCP server logic. We are going to build it step by step.
Dependencies
We will need some Python libraries, so I recommend using a Python virtual environment.
python3 -m venv .venv
source .venv/bin/activate
pip install mcp paramiko python-dotenv uvicorn
Step 1: Start With a Placeholder MCP Server
Before connecting to Cisco, I first created a working MCP server with one fake tool.
The important class is FastMCP:
from mcp.server.fastmcp import FastMCP
Then I create an MCP server object:
mcp = FastMCP(
    name="cisco-cli-lab",
    host="0.0.0.0",
    port=8000,
    streamable_http_path="/mcp",
)
We call it from inside Docker, so the host must be
0.0.0.0to accept connections from the container.
This creates a Streamable HTTP MCP server.
The MCP endpoint is: http://localhost:8000/mcp
Because OpenWebUI runs in Docker, it connects to the host machine using:
http://host.docker.internal:8000/mcp
Step 2: Add the First Tool
In Python, we register a tool with a decorator:
@mcp.tool(
    name="cisco_show_version",
    title="Cisco Show Version",
    description="Run the Cisco 'show version' command.",
)
def cisco_show_version() -> str:
    return "Placeholder output"
The @mcp.tool(...) line means:
Register this Python function as an MCP tool.
So when OpenWebUI asks the MCP server what tools are available, the server can answer:
cisco_show_version
At this stage, the function only returned placeholder text. This was useful because it tested the MCP connection before adding SSH.
Step 3: Separate Tool Name From Cisco Command
The MCP tool name and the Cisco command are not the same thing.
The MCP tool name is:
cisco_show_version
The Cisco CLI command is:
show version
We made that mapping explicit:
def run_cisco_command(command: str) -> str:
    return f"Would run Cisco command: {command}"


@mcp.tool(
    name="cisco_show_version",
    title="Cisco Show Version",
    description="Run the Cisco 'show version' command.",
)
def cisco_show_version() -> str:
    return run_cisco_command("show version")
This is an important design idea:
The MCP tool decides which Cisco command is allowed.
Step 4: Add the .env Contract
We loaded .env with:
from dotenv import load_dotenv

load_dotenv()
Then we added a helper for required variables:
def get_required_env(name: str) -> str:
    value = os.getenv(name)
    if not value:
        raise RuntimeError(f"Missing required environment variable: {name}")
    return value
This makes errors clear. If CISCO_HOST is missing, the program says exactly
what is wrong.
Step 5: Make OpenWebUI Reach the MCP Server
OpenWebUI is running in Docker.
That means 127.0.0.1 from inside the container does not refer to the host machine—it refers to the container itself.
So the MCP server must listen on all local interfaces:
host="0.0.0.0"
And in OpenWebUI, the MCP server URL is:
http://host.docker.internal:8000/mcp
This is the important Docker networking detail.
Step 6: Add Paramiko
After the MCP tool worked with placeholder output, we replaced the helper with real SSH code.
The SSH helper now:
- Reads router settings from .env
- Connects with Paramiko
- Opens an interactive shell
- Enters enable mode if CISCO_ENABLE exists
- Sends terminal length 0
- Sends show version
- Reads the output
- Closes the SSH connection
Why interactive shell instead of exec_command()?
For Linux servers, this often works:
client.exec_command("show version")
But Cisco network devices often behave more naturally with an interactive CLI session. So we used:
shell = client.invoke_shell()
That is closer to a human typing commands into the router.
Final server.py
This is the working minimal version:
import os
import time

from dotenv import load_dotenv
from mcp.server.fastmcp import FastMCP
import paramiko


load_dotenv()


mcp = FastMCP(
    name="cisco-cli-lab",
    host="0.0.0.0",
    port=8000,
    streamable_http_path="/mcp",
)


def get_required_env(name: str) -> str:
    value = os.getenv(name)
    if not value:
        raise RuntimeError(f"Missing required environment variable: {name}")
    return value


def read_shell_output(shell: paramiko.Channel, wait_seconds: float = 1.0) -> str:
    output = ""
    deadline = time.time() + wait_seconds

    while time.time() < deadline:
        if shell.recv_ready():
            output += shell.recv(65535).decode(errors="replace")
            deadline = time.time() + wait_seconds
        else:
            time.sleep(0.1)

    return output


def run_cisco_command(command: str) -> str:
    host = get_required_env("CISCO_HOST")
    port = int(os.getenv("CISCO_PORT", "22"))
    username = get_required_env("CISCO_USERNAME")
    password = get_required_env("CISCO_PASSWORD")
    enable_secret = os.getenv("CISCO_ENABLE")

    client = paramiko.SSHClient()
    client.set_missing_host_key_policy(paramiko.AutoAddPolicy())

    try:
        client.connect(
            hostname=host,
            port=port,
            username=username,
            password=password,
            look_for_keys=False,
            allow_agent=False,
            timeout=10,
        )

        shell = client.invoke_shell()
        read_shell_output(shell)

        if enable_secret:
            shell.send("enable\n")
            time.sleep(0.5)
            shell.send(f"{enable_secret}\n")
            read_shell_output(shell)

        shell.send("terminal length 0\n")
        read_shell_output(shell)

        shell.send(f"{command}\n")
        output = read_shell_output(shell, wait_seconds=2.0)

        return output.strip()
    finally:
        client.close()


@mcp.tool(
    name="cisco_show_version",
    title="Cisco Show Version",
    description="Run the Cisco 'show version' command.",
)
def cisco_show_version() -> str:
    return run_cisco_command("show version")


if __name__ == "__main__":
    mcp.run(transport="streamable-http")
Testing Without OpenWebUI
Before testing through OpenWebUI, we can test the Python function directly:
source .venv/bin/activate
python -c "from server import cisco_show_version; print(cisco_show_version())"
If the credentials and SSH access are correct, this prints the router’s
show version output.
Running the MCP Server
Start the server:
source .venv/bin/activate
python server.py
The server listens on:
http://0.0.0.0:8000/mcp
For OpenWebUI in Docker, configure the MCP server URL as:
http://host.docker.internal:8000/mcp
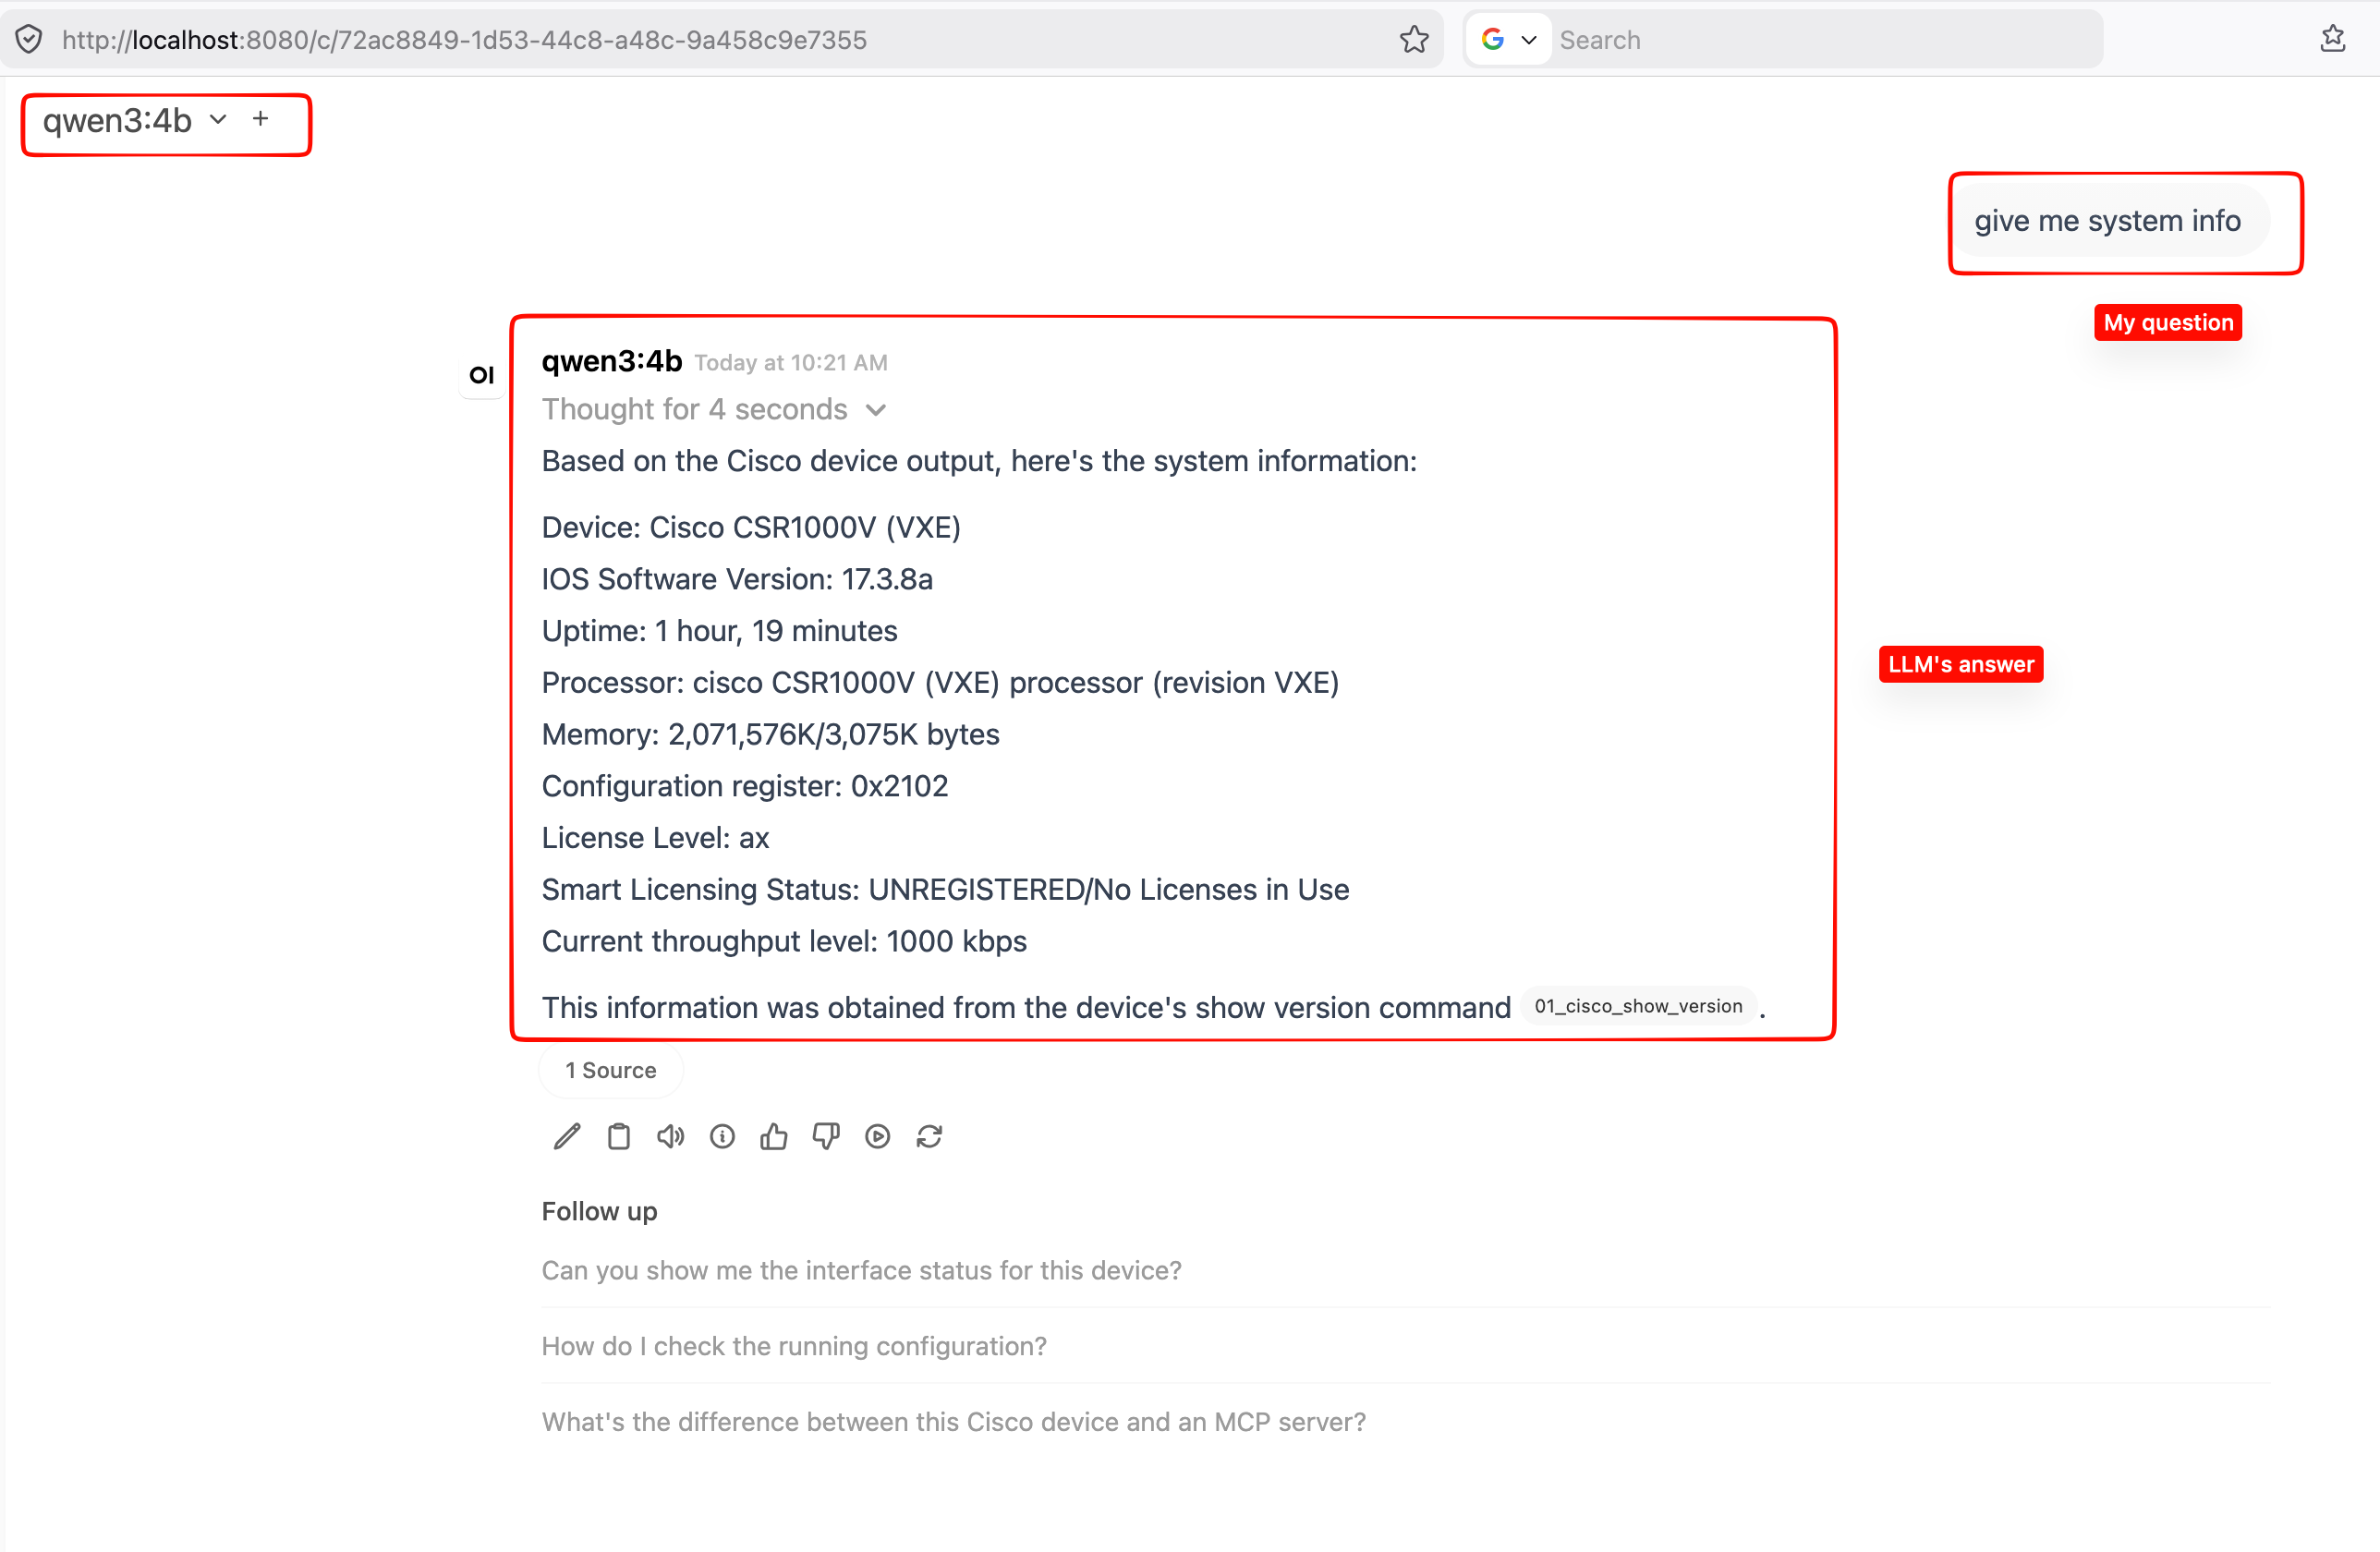
OpenWebUI should discover this tool:
cisco_show_version
When the tool is called, it connects to the router and returns the raw output of:
show version
Testing with OpenWebUI
Why Start This Small?
Network automation can become dangerous quickly.
It is tempting to create one general tool:
run_command(command)
But that would allow the AI to send anything, including configuration or destructive commands.
Starting with one explicit read-only tool is safer:
cisco_show_version -> show version
The next safe tools could be:
cisco_show_ip_interface_brief -> show ip interface brief
cisco_show_interfaces         -> show interfaces
cisco_show_ip_route           -> show ip route
Each tool should map to a known safe command.
What We Learned
We built the project in small layers:
- Create a minimal MCP server.
- Register one MCP tool.
- Map that tool to one Cisco command.
- Load connection settings from .env.
- Make Docker-based OpenWebUI reach the server.
- Add Paramiko SSH.
- Test the tool from OpenWebUI.
The most important lesson is separation:
- OpenWebUI is the user interface.
- MCP is the tool protocol.
- FastMCP is the Python server helper.
- Paramiko is the SSH library.
- The Cisco router only sees normal CLI commands.
That separation makes the system easier to understand and safer to extend.